Project / Built Work

2003 Ford Ranger Flatbed

A permanent steel flatbed designed around durability, cargo flexibility, and the way I actually use the truck.

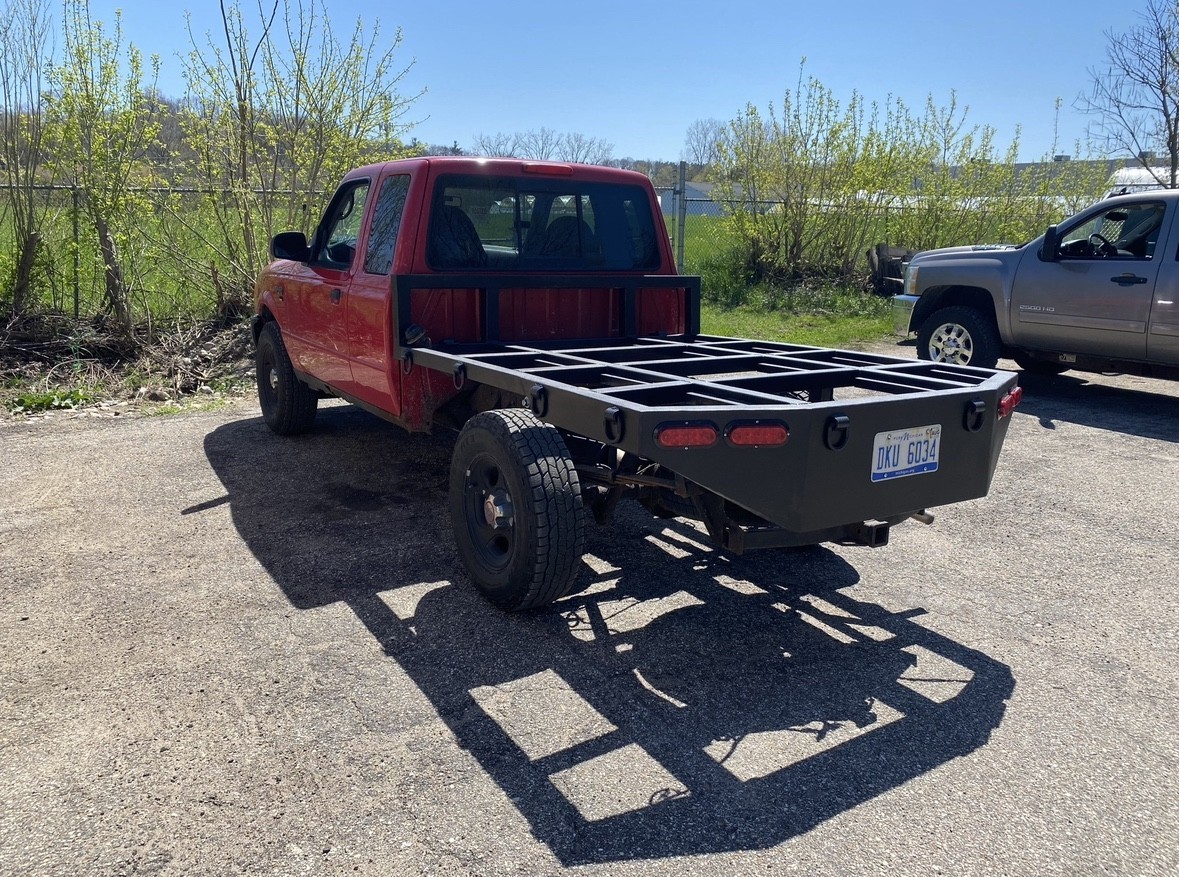
After the original pickup bed rusted beyond practical repair, I built a temporary replacement to keep the Ranger usable. I then used what I learned from that prototype to design and fabricate a finished flatbed with an integrated headache rack, LED lighting, twelve tie-down points, and a 2x6 wood deck.

01 / Purpose

Why I built it

The factory bed had become badly rusted. Instead of installing another used pickup bed, I decided to build something more durable and more useful for the cargo I regularly move. A flat deck makes awkward loads easier to place, provides more options for securing them, and removes the limitations of conventional bed sides when hauling oversized material.

The final bed was modeled in Fusion 360 before fabrication. The completed frame fit the truck correctly on its first installation, validating the dimensions and factory mounting geometry established in the model.

CAD
Fusion 360
Deck
2x6 wood boards
Rear panel
1/8 in steel over tubular frame
Welding
MIG / MillerMatic 250
Lighting
LED tail, turn, reverse, and plate lights
Finish
DIY bed-liner coating
Bed weight
Approximately 500 lb
Project cost
Approximately $300

02 / Development

Prototype to permanent design

The project developed in two distinct stages. Version 1 was a quick, low-cost way to return the truck to service. Version 2 was a clean-sheet design that brought the structure, cargo control, cab protection, lighting, and finish together as one permanent assembly.

Version 1 / Functional prototype

The first bed used repurposed pallet-racking steel welded to lawnmower blades that served as mounting brackets. The brackets bolted to the Ranger frame, and 2x6 boards formed the deck. I reused the factory taillights and temporarily zip-tied them below the bed.

It carried roughly 500 lb at its heaviest and proved that the basic flat-deck layout worked. The exposed lights eventually took on water and failed, and the prototype lacked the integrated tie-downs, lighting protection, and appearance I wanted.

Version 2 / CAD-planned build

I started over in Fusion 360, the CAD system I was using before SolidWorks became my regular design tool. The model established the overall frame, crossmember layout, headache rack, rear structure, and factory mounting geometry.

I kept the crossmember pattern straightforward so it would provide broad support for the wood deck, create a rigid welded frame, and remain practical to fabricate. The assembly fit correctly on the first installation.
03 / Structure

Mounting and fabrication

The primary frame is fabricated from 2.5 x 2.5 inch square steel tubing with 1/8 inch wall. It bolts to the truck at four original factory bed mounting locations, so the Ranger frame did not need to be redesigned or permanently altered around the new bed.

Integrated structure

The wood deck is supported by the welded crossmembers. A steel headache rack behind the cab helps prevent large cargo—especially an ATV—from rolling or sliding into the back of the cab and also provides another secure strap location.

The completed assembly weighs approximately 500 lb, roughly twice the weight of the original pickup bed. That added mass is a bonus in Michigan winters, as ford rangers are fairly light.

Shop work

I fabricated the complete bed over roughly three weeks of after-work shop time. The frame was MIG welded with a MillerMatic 250. I made the rear face from 1/8 inch steel and cut the lighting openings by hand with an angle grinder.

I applied a DIY bed-liner coating as it was cheap and i needed a usable bed quickly. It gives the steel a durable surface that suits the truck and is easier to touch up than automotive paint or powder coat.

04 / Utility

Cargo handling and lighting

Twelve tie-down points

Twelve D-rings are distributed around the perimeter. Instead of relying on a few fixed anchors, I can select a tie-down location close to the cargo and run the strap in the direction that secures the load most effectively.

The open deck and flexible anchor layout have been especially useful for steel, workbench components, ATVs, canoes, kayaks, and other irregular or oversized loads.

Protected LED lighting

The rear panel integrates LED tail, turn, reverse, and license-plate lighting. I wired the new lights into the factory harness and placed them in protected, purpose-built openings within the rear structure.

This solved the water-damage problem that ended Version 1 and gave the back of the truck a much more complete appearance while keeping the lights visible during loading and normal use.